Independent Stampin' Up! Demonstrator - Coldwater, Michigan - KatheD@gmail.com
Showing posts with label altered. Show all posts

Thursday, August 31, 2017

bookish adventures

Love Today is the ring-bound planner kit available from Stampin' Up! this year - I love mine!
In addition to monthly dividers, monthly pages and weekly pages, it comes with more stickers than I'll ever need (I used only three for the cover) as well as pockets, flags, sticky notes, and photo pages.  But I felt I needed a few more accessories.  I started with a simple tasselled paper clip.  I found the elastic band pencil pouch (seen in the corner of the photo above and on the left below) on clearance at one of the big box stores.  I found a vinyl pocket folder at Dollar Tree, turned it horizontally and cut it down to provide another pair of slip-in pocket pages for loose papers:
The small art journal in the slot of the left pocket was one I made while I was still working, folded from one piece of copy paper according to an Instagram tutorial I saw.  The "art" is office junk mail collages and highlighter designs lettered with encouragement.  The Instagram version wasn't covered, but I used a discarded report cover to give mine a little more protection.

In the other pocket, I felt I needed a small separate notebook.  When I read about the Mini Album Makers Challenge blog launch, I decided to make one:


I had many blank dot and grid pattern pages left in the back of an old spiral-bound planner, perfect for card sketches or notes on the run, so I removed and slightly trimmed them.  My original intention was to make a traveler's notebook style, and the cover was a file folder that I cut down for that purpose.  I didn't want the signatures nested, though, because that would separate the patterns from each other, so I perfect-bound the pages (folded each sheet in half separately and spread glue on the spine edges).  I inserted the pages into the cover using the traveler's-notebook-style elastic spine, so I could reuse the cover.  It's sort of a hybrid, but I think it's going to work for me!

Just this evening, I tried my hand at another type of book art.  My public library hosted a workshop where we used fabric and trims (and a lot of glue) to transform blank bound dollar-store journals:

Sunday, May 31, 2015

Star Struck Stampers masculine adventures

Our assignment for Star Struck Stampers team meeting today was Father's Day or masculine.  I thought I would take the leftover kits from Card Buffet for this card.  It was going to need a few minor changes to bring all the supplies to current, so I set about to do that this morning and discovered there were *no* leftover kits!  Card Buffets this month were busy, and so much fun - I love all the chatter and the new ideas I get from the creative participants!  

Since I needed to start from scratch, I used the sketch from CAS(E) this Sketch to make it easier:

stamp sets - Crazy about You, Gorgeous Grunge; ink - Lost Lagoon, Hello Honey; card stock - Hello Honey, Lost Lagoon; bakers twine - Crushed Curry

I also needed a 3D (anything but a card or scrapbook page) swap.  I thought about a mini bag or box, but didn't have any treats to fill them with (with which to fill them). I considered a gift card holder (my husband and my grandson's fathers will all receive gift cards), but that seemed too card-like.  I settled for an old stand-by and re-covered little note pads, because I had them on hand:
stamp sets - And Many More, The Open Sea; ink - Crumb Cake, Soft Suede, Night of Navy, Always Artichoke; card stock - Very Vanilla, Soft Suede; Stampin' Sponge

I've been totally captivated by collage-style stamping recently, and these were a lot of fun.  I may be a little too proud of myself for deciding on colors and stamp placement all by myself - no CASE-ing or challenge prompts involved!

And as a final visual treat, this is one of the cards we made, from a teammate's design.  It was a Father's Day card, but I need more birthday cards, so I switched the sentiment, making it perfect for the Seize the Birthday challenge Anything Goes:
stamp set - And Many More; ink - Pacific Point; card stock - Whisper White, Real Red, Pacific Point, Daffodil Delight, Pumpkin Pie, Basic Black; punch - Modern Label; Big Shot with Arrows embossing folder

Wednesday, May 29, 2013

altered Altoids® adventure - a tutorial

Since Terri asked so nicely about the altered Altoids® tin I did for the blog hop, I've attempted a picture tutorial.

All you need are an Altoids® tin, designer series paper, some embellishments and Crystal Effects.  A good pair of paper snips is a must; a pencil and one of those fake credit cards from your junk mail will also be quite useful.

Start by cleaning the tin, washing out the candy dust and drying it well.  Trace the tin onto the designer series paper for the top (Print Poetry shown below) and the bottom and cut out the two pieces, cutting inside the traced lines.  Test fit them and trim if necessary. 

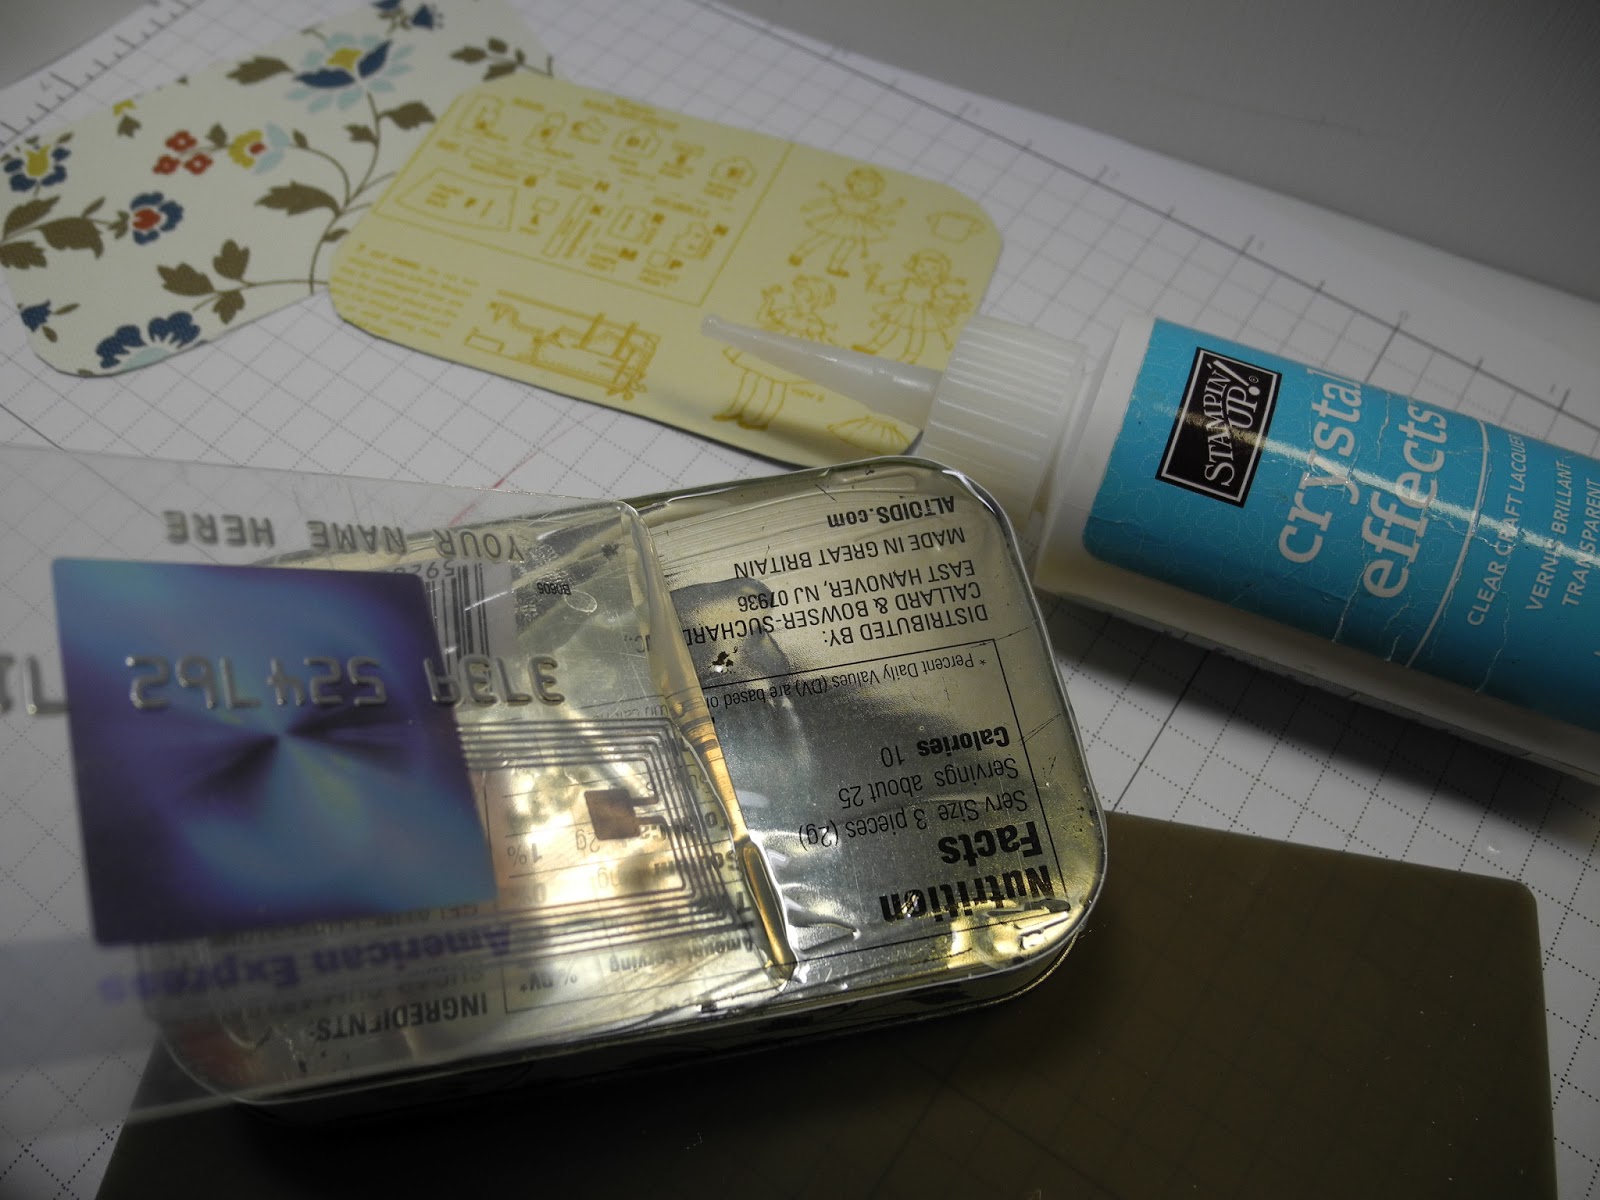
Cut two strips of designer series paper (I used retired Comfort Cafe for this tin) 12" long and 1/2" wide for the sides.  The strip that covers the bottom half of the sides should only extend to the lid when it's closed, not under it.  For both of the tins I've altered, the width of the bottom sides was exactly 1/2".  Starting at the center back of the tin, spread a thin layer of Crystal Effects on the tin (that fake credit card makes an excellent spreading tool!) and smooth the strip of designer series paper onto the tin. 


Continue around the corner and the end, spreading Crystal Effects and smoothing the paper down, and keep going around the tin, spreading CE and smoothing the paper down.  Before you glue down the last part at the back, trim off the excess paper to leave just a small overlap.

Use the fake credit card to spread a thin layer of Crystal Effects on the bottom:

Press and smooth the paper down all over, especially at the edges.  I wasn't too worried about perfection for the bottom and you can see a very slight gap in the upper right corner where the base piece doesn't quite meet the edge piece.

The second 12"x1/2" wide strip will cover the sides of the lid, above the little rolled metal lip, and will extend above the top of the lid.  Hold the strip against the center back and use your fingernail to mark where the hinge falls.  Trim out that little section before beginning to glue the strip.  Use the same method as the bottom sides - spread a thin layer of Crystal Effects, press the paper down, and continue around to the starting point.  Before spreading Crystal Effects on the last half of the back, mark and trim out the rectangle for the hinge, and trim the excess length off the strip so there's only a slight overlap (I haven't trimmed the length in this photo, but it shows the hinge cut-out):
The width of the strip that extends above the top of the lid will ensure that there are no little gaps of metal peeking out on the top.  Snip the overhanging paper, from the edge of the paper right up to the tin, at each curved corner.  Snip straight down the center of the curve and right where the curves start:

Using a little bit of Crystal Effects, glue down each tab.  This photo shows the tabs bent down, before gluing: 
You'll have to hold them down for a minute before moving on the next corner.  After all the corners are glued, then glue down the straight edges, again using a thin strip of Crystal Effects and pressing down the paper.  (You may want to take a little break to rub or wash the Crystal Effects off your fingertips at this point.)  Use your handy spreading tool to get a thin coat on the entire top of the tin, including the paper border, and smooth on the designer series paper.  Pay particular attention to the edges again:
Now it all needs to dry!  I leave it for at least 12 hours. 

If you want ribbon on the edge, I recommend Sticky Strip.  Apply it to the ribbon first, burnishing it on, then apply the ribbon to the tin, again burnishing it on.  I started in the center front, and added a bow over the seam.  I used Crystal Effects to attach the bow - it took more than I expected and took a long time to dry, but it seems to be very secure now.  I held it in place while it dried with a wooden spring-action clothes pin (a binder clip would work, too).

Cover the bottom of tin with a thick layer of Crystal Effects.  Draw it along one edge, using the tip of the bottle to push the CE right to the edges. 

 Move back and forth across the tin, adding and spreading CE as you work.  Take your time, and try to make an even layer all over, using the bottle tip to push the CE around as needed.  If you notice a thin spot, add a little CE and spread it into the surrounding area.

Now it needs to dry again, this time for at least 24 hours.  Depending on your humidity, it may take longer!  You can see in the photo above that it's a little cloudy; you'll know it's dry when it's clear.

Cover the paper on the sides of the tin with a layer of Crystal Effects and let it dry.  The edges don't get as much wear, so I only put on a thin layer.  Don't spread CE on the hinges, just around them.

Arrange your embellishments on the top and stick them in place with Crystal Effects.  If you have a stamped element, the top layer of Crystal Effects will cause the stamping to blur.  I used Versamark and clear Stampin' Emboss powder on my name banner to keep it from blurring, but for some stamped images a little blurring might be artistic. 

When the CE holding the embellishments is dry, start your thick top layer by going around the raised embellishments first.  The Cajun Craze card stock sizzlit button needed a little supporting CE under the edge, and I also covered the tops of all the buttons.  Working out from the embellishments, filling in between them first, add and spread CE using the bottle tip.  Work out towards the edges, and push the CE right up to the edges of the tin.
On the first tin I altered, I put three thin layers of CE on the top, allowing it to dry completely between layers.  That tin had a card stock butterfly embellishment on two layers of thin cardboard, and the three layers of CE together were level with the card stock.  I intended to add a fourth layer on top of the stamped card stock, but then I remembered that the CE would cause the stamping to blur, so I didn't add that last layer.  For this tin, I only used one thick layer.  It isn't level with the embellishments, but since they're covered and there is CE around the edges of the embellishments as well, they're not going anywhere.

In the photo below, you can see that it becomes clear when it's completely dry:
Now it's time to fill it!
I hope you found this helpful, feel free to leave a message or send an email if you have any questions.

Thursday, April 25, 2013

April Showers Blog Hop adventure


Aren't Llama Blog Hops awesome?  I ♥love♥ seeing all the creative and inspiring projects!  You may have hopped here from Jackie's page (where there are some beautiful blooms as a result of her April Showers), but if not there are many ways to get there.  The Back button below will take you directly there, the Next button below will take you to Stephanie's page (the same amazing Stephanie who creates the banners and buttons for our blog hops!),  and if you continue clicking on Next buttons at each following page, you will get to Linda's after you've visited all the other pages between here and there.  If all else fails, you can click on Home to find a clickable list of all the hoppers!

My projects this month are craft-room Spring Cleaning - ideas that needed to be finished up and cleared out.  Last year I had a few (ok, it was a LOT) too many 1/2" strips of designer series paper and I made some different quilt-block themed birthday cards.  Here are the two newest cards, which make it a set of six:


stamp set - Petite Pairs; ink - Primrose Petals; card stock - Primrose Petals, Baja Breeze; designer series paper - Patio Party; punch - large oval, Big Shot with Bitty Banners framelit; Stampin' Sponge

card supplies: stamp set - Priority Mail (hostess); ink - Primrose Petals; card stock - Primrose Petals, Summer Starfruit; designer series paper - Patio Party; punch - Curly Label
envelope supplies: stamp set - Make a Cake; ink - Midnght Muse, Stampin' Write Markers - Summer Starfruit, Midnight Muse, Primrose Petals


I didn't know what I was going to do with a set of birthday cards, until the Relay for Life team where I work announced that they'll be holding an auction of goods and services the rest of us donate - so I made a box to keep them together (I still have some of those 1/2" strips):


box supplies: card stock - Window Sheet, Baja Breeze textured (retired); designer series paper - Patio Party; Big Shot with Top Note die
visible card supplies: stamp set - Bitty Banners; ink - Midnight Muse; card stock - Baja Breeze; Big Shot with Bitty Banners framelit;   3/8" stitched satin ribbon - Primrose Petals; Stampin' Dimensionals

 When I made the Thank You card that I showed you in the Spring-a-Bration blog hop I first stamped and matted the sentiment in Wild Wasabi, but that card really needed the extra pop of Riding Hood Red.  The Wild Wasabi piece has been on top of the useful-bits-and-pieces pile at the side of my work space for a while, and it just needed a simple card:
stamp set - Perfectly Penned; ink - Wild Wasabi; card stock - So Saffron, Wild Wasabi;  designer series paper - Storytime; Big Shot with Labels Collection framelit, Stampin' Dimensionals

My last project is a synthesis of three obsessions - Pinterest, Altoids tins, and (obviously) paper crafting.  I accidentally came across an altered Altoid tin on Pinterest and, like a certain potato chip, I couldn't have just one.  I learned that credit cards (or rewards/loyalty cards) fit inside, so I decided I "needed" one.  One of the samples was done with dimensional Mod Podge, so I temporarily added that to my mental shopping list.  Fortunately, before I spent money at an out-of-town big box store, it occurred to me that Crystal Effects would work!  I used retired paper & ribbon because they coordinate with the mini photo album I carry, but this project would work with your favorite choices from the current catalogs, as well:


stamp sets - Easy Events, Papillon Potpourri; ink - Soft Suede, Not Quite Navy; card stock - Very Vanilla, Baja Breeze; designer series paper - Elegant Soiree (retired); 3/8" pleated satin ribbon - Baja Breeze (retired), miscellaneous scrap of unkown origin ; buttons - Vintage Faceted, Twitterpated (retired); Crystal Effects

It was a lot of fun, and I'm thinking there may be mini sewing kits and jewelry boxes in my future crafting plansMy best advice is use Crystal Effects under the paper as well as on top; if the paper isn't completely stuck to the tin it will raise up at the edges or bubble up in the center - I did the bottom of the tin first, and didn't take a picture to share with you, but you can ask me how I know if you want. ;)  Also, be sure to let each layer (I have one on the edges, two on the bottom, three on the top) dry thoroughly before adding the next.

Please hop on by selecting one of these buttons to see more fabulous April Showers projects:


Friday, September 16, 2011

alteration adventure

Last week, I found a new challenge blog - LESSology - I thought it would be fun to try some things besides cards, so I thought about altering a book for Challenge #1.

Last month when I was shopping at Goodwill for craft supplies with AJ and her sisters, I came across a matched pair of dark green leather bound books for a quarter each that I bought specifically for a future, as-yet-undecided craft project.  They look pretty decorative sitting on top of the glass-front bookcase where I keep my sets of books and cool-looking vintage books.  I couldn't alter them for this project.  Chances are I won't ever alter them, because they're books, and they're leather bound, and they look cool, but it could happen.

Earlier this week I went to Goodwill to look for a child's book, preferably a board book, to alter.  The only one I found was cute and bright and cheerful and may help some disadvantaged young person who can only afford twenty-five cent books to learn to love books and reading.  I couldn't alter that book for this project.  I went to the Dollar Store and found a board book with too many words to appeal to a young child and illustrations that didn't look they would appeal to an older child, so I thought I could alter that book for this project.

But, I couldn't think of anything even slightly original to do with it - my only idea was to treat it like a scrapbook and put photos in it.  So, I wondered, why don't I just use a photo album?  I remembered that I had one at home, and I didn't like the cover much, but it's perfect for wallet-size photos of the world's cutest grandson.  I almost never make projects for myself, but this one will be in my purse and pulled out as often as I can find anyone to listen to my bragging:

 I used some retired Stampin' Up! designer series paper and cut a label using the Matchbox BigzXL die with my Big Shot.  The label is from the Teeny Tiny Wishes stamp set and the bow was one of those hanger ribbons from inside a pair of slacks.  Does anyone really use those hanger ribbons?  I just use hangers that have clips, and the ribbons tickle me or irritate my skin or flop outside and look stupid, so I cut them out and throw them in my stash.  This is what that album looked like before - just not something that suits my taste: