Independent Stampin' Up! Demonstrator - Coldwater, Michigan - KatheD@gmail.com
Showing posts with label 3D. Show all posts

Monday, September 24, 2018

adventures in holiday preparation

While I was playing with the Halloween theme last week (I designed a card for next month's Card Buffet and did a few cut-and-paste pages in a junk journal), I remembered this kit I received as an incentive prize several years ago.  At TGIF Challenges inspiration this week they said "now is the perfect time to get started on all those holiday projects," so I pulled it out and completed it:
stamp set - Toxic Treats (retired); ink - Old Olive, Tuxedo Memento Black; Stampin' Write markers - Basic Black, Old Olive; Howl-O-Ween printer's tray kit (retired); photo of the two cutest grandsons in the known world!

I had so much fun, even including the fussy cutting (I KNOW! what has happened to me, right?), that I decided it was finally time to update the twinchies shadow box I made a few years ago.  In the past I only had summer and winter themes, and Tom wondered why not spring and fall?  Since the Halloween one will be in that spot on the wall this year, I skipped fall and went for Christmas:
stamp sets - Antique Tags, Best of Christmas, Holly Berry Happiness, Santa's Sleigh, Seasonal Bells, Scentsational Seasons (all retired) ink: Cherry Cobbler, Garden Green, Memento Tuxedo Black, Versamark, White Craft; Stampin' emboss powder Silver; card stock - Cherry Cobbler, Garden Green, Silver Foil, Whisper White; designer series paper - Dashing Along; punches - Bell, Holly Builder, Five Petal Flower (all retired, not sure the name is right on the last one); Big Shot with Layering Circles, Santa's Sleigh (retired), and Scentsational Seasons (retired) framelits, and Pretty Pines thinlits; Basic Rhinestones (retired), Dazzling Details - Cherry Cobbler and Silver Sparkle (retired)

In addition to being holiday preparations, these are also things 70 and 71 in my #DWPB100ThingsChallenge, and no new purchases were involved!

Tuesday, May 8, 2018

some new challenge adventures

I've found some new challenges recently that appeal to my sense of adventure - I hope you enjoy them, and maybe even join in? 

Lost Coast Designs and Carmen's Veranda had a booth at the Scrapbook Expo I attended last year, and I bought some stamps I think will be great for art journaling.  They have very unique rubber stamp designs, and I've recently discovered they also have a challenge blog - yay!  This card from Fiona Bradley was so perfect for the orange and yellow prompt, I just used the same Stampin' Up! design she used:
stamp set - Flourishing Phrases; ink - Pumpkin Pie, Daffodil Delight; Stampin' Write marker - Pumpkin Pie; card stock - Whisper White

Crazy Rebecca at Dances With Pit Bulls is doing her second year of #DWPB100ThingsChallenge.  The rules are pretty simple - make 100 things with the craft supplies you already own before you buy any more!  I needed a little book in which to record my 100 things, so my thing number one is these paper-napkin-covered journals made of flattened toilet paper roll tubes:

Thing number two is a sign for Rebecca to use in her YouTube videos. I don't want to post it before she sees it; if I remember I'll show you later, although it's not really all that special - just some clip art I copied and pasted, with a fun font, on metallic card stock.

Thing number three is a junk journal page for a swap - another new thing I've gotten involved with this year:
The base page is long-retired Flirtatious specialty designer series paper; the tags and pocket are bits and bobs from my stash.  It's not complete in this photo - I added a mini envelope to the front that I made from a scrap of deli paper.  I could have used vellum, but the deli paper was on its way to the bin, and seemed like a better choice for a junk journal.  I'm looking for something that says Mother's Day to put in the envelope, to tie into the monthly swap theme.  I hope to also add a decorated paper clip when I work on that challenge later this month.

And then thing number four is a postcard for the Sunday Postcard Art challenge I've just started following.  This week they're looking for crowns & wings - I added a bit of fun & fantasy:
stamp sets - Lucky Elephant (retired), Favorite Thoughts (retired), Extreme Elements (retired), Timeless Textures, Touches of Texture; ink - Pineapple Punch, Wisteria Wonder, Elegant Eggplant, Tangerine Tango, Peekaboo Peach, Tempting Turquoise, Rich Razzleberry, Strawberry Slush (retired), Lemon Lime Twist, Island Indigo, Wild Wasabi, Rose Red, Hello Honey (retired); card stock - Whisper White and Wisteria Wonder; punch - Pretty Label; Big Shot with Beautiful Butterflies Bigz die (retired) and White Tea Lace paper doilies (retired)

This is the first postcard I've ever made from scratch.  In retrospect I think I probably should have coated it, and possibly also added a second layer of card stock.  I mailed it in an envelope, though, so it will arrive safely in spite of my oversights.

Monday, January 29, 2018

adventures with Christmas cards and other challenges

I'm still up-to-date with #365somethings2018 which is #365cards2018 for me. Here are cards 23 through 29:
Why, yes, there is a new Christmas card, on the left in the center row - I used the Fab Friday sketch and the Jingle Belles prompt "Text Me":
stamp set (on envelope) - Patterned Pines (hostess, retired); card stock - Real Red, Old Olive; designer series paper - Merry Music (retired), Christmas Around the World (retired); punch - Decorative Ribbon Border

I made another Christmas card today, using the expired (oops!) fairy theme from 52 Christmas Card Throwdown, which I think paired brilliantly with the new Merry Monday prompt for pastel colors:
stamp set - Endless Wishes (retired), Christmas Fairy (from Cardmaking © Origin Publishing); inks - Sweet Sugarplum, Soft Sky, Pink Pirouette Sahara Sand; blender pen; Stampin' Write marker - Soft Sky; Wink of Stella - gold (retired), clear; card stock - Whisper White, Pink Pirouette, Soft Sky; Big Shot with Deco Labels framelits (retired)

I'm not claiming the decision to make the fairy sparkly gold was as brilliant as the fairy + pastel colors pairing, though :\ I'm trying to reserve judgement on that for now.

For another challenge, I completed my #12PaperClipsOf2018 for the February "hearts" theme, and gave away three of them.  I'll use mine in my planner, to help keep me organized, and to qualify at Cut It Up! Challenge:
stamp sets - Labeler Alphabet, Heart Happiness; ink - Versamark; Stampin' Emboss powder - white; card stock - Real Red, Whisper White; punch - Cookie Cutter Builder; Big Shot with Sweet & Sassy framelits; Fine-Tip glue pen  

Finally, I'm also still up-to-date with #LlamasLoveLettering for January 2018, but I'll spare you a picture since there is much scribbling on that page now :0  I've learned to appreciate the "crop" requirement for Instagram posts!  

I could probably stick with a daily challenge for one more month, but I'm not really excited about doodling or lettering.  I've been toying with going back to the 4x4 format, which I originally tried for the 100 days project; maybe 28 faces...


Sunday, August 21, 2016

color challenge adventures

Gail's color choices for the Watercooler Wednesday challenge look delectable, don't they?
But, I skipped my first impression and went for summer flowers, inspired by these cards of Jackie Susnik's:
stamp sets - Touches of Texture, Better Together; ink - Peekaboo Peach, Daffodil Delight; card stock - Peekaboo Peach, Very Vanilla, Watermelon Wonder, Pear Pizzazz, Daffodil Delight; Big Shot with Flourish thinlits

At Jingle Belles, the color of choice is red:
stamp sets - Cookie Cutter Christmas, Wondrous Wreath; ink - Basic Black, Cherry Cobbler, Basic Gray; card stock - Cherry Cobbler, Very Vanilla specialty designer series paper - This Christmas; punch - Cookie Cutter builder; Big Shot with Layering Ovals framelits; other - blender pen, chalk marker, clear & gold Wink of Stella

And at Winter Wonderland, the color is your choice, plus white.  Our demonstrator team met this afternoon, and Debbie brought this stunning design for her shoebox swap:
stamp set - Star of Light; ink - Pacific Point; card stock - Whisper White, Pacific Point; Big Shot with Starlight thinlits; Basic Rhinestones
Actually, Debbie's design was in portrait orientation, but I stamped my sentiment on the wrong triangle piece and decided to reorient rather than start over.  Usually I would just flip the card stock over, but the cutting lines were penciled in and I didn't want to erase them.  Yes, I am that lazy, but also I'm kind of klutzy and would probably have mangled the edge while erasing.  Oh, and sometimes the more intense colors show through on the flip side of white card stock.  That's it - that's the reason - or at least that's my story.

While I was working on the Cookie Cutter Christmas card, I had to test out the reindeer version, too, so here are some gift tags for the Anything But a Card prompt at Holly Jolly Christmas:
stamp set - Cookie Cutter Christmas; ink - Soft Suede, Real Red; Stampin' Write marker - Real Red; card stock - Soft Suede, Crumb Cake; punch - Scalloped Tag Topper; Cherry Cobbler baker's twine

Sunday, May 15, 2016

boxed-in adventure

Over at the Watercooler, I think Deb called it "boxed-up".  Boxed-in / boxed-up - those are not quite the same, are they?  Either way, I loved Marsha's box for a set of greeting cards, but I used Roni's instructions so I can be sure to fit in A2 cards with envelopes when I get the set completed.
stamp set - Party Wishes; ink - Basic Black; card stock - Melon Mambo, Crushed Curry; designer series paper - It's My Party
Wait, what happened here - no punches, no Big Shot?  No embellishments of any kind - that's not like me!  I love the positive/negative aspect of this paper, and didn't want to take away from it, but don't worry, the cards inside will be a bit fancier!  I'm thinking a set of eight, two each on Melon Mambo, Crushed Curry, Sahara Sand and Mint Macaron bases, so they can go to men or women.

Sunday, October 4, 2015

triplet adventures

I needed a 3D project to share with my upline's Star Struck Stampers team today, and the challenge this week at the Watercooler is 3D.  I'm not very creative when it comes to ideas for 3D; I usually turn to Pinterest for ideas and make adjustments that work for me.  The challenge this week at Stampin' Royalty is to use Pinterest for inspiration - I can do that!  I found this little cutie earlier this year and was waiting for the right time to use it.  Since the white "fur placket" piece is embossed, the challenge at Little Red Wagon, that's a triplet of  challenges for this project:
card stock - Gold Glimmer, Basic Black, Real Red, Whisper White; punch - Decorative Label; Big Shot with Boho Chic embossing folder; Envelope Punch Board; Stampin' Pierce mat, Updated Essentials piercing templates, Paper Piercing tool
And even when I can enter three challenges with one project, one is almost never enough for me, so I have a pair of embossed cards (making all three eligible at Little Red Wagon) that complete a triplet of cards for the other winter holidays at Jingle Belles:
stamp sets - Lovely as a Tree, Holly Jolly Greetings; ink - Mossy Meadow, Sahara Sand; Stampin' Write marker - Early Espresso; card stock - Whisper White, Mossy Meadow, Early Espresso; punch - Hexagon; Big Shot with Woodland embossing folder
stamp sets - Gorgeous Grunge, Holly Jolly Greetings; ink - Soft Sky; card stock - Soft Sky, Whisper White; Big Shot with Woodland embossing folder

Tuesday, August 25, 2015

not summer adventures

I know, I said I'm not ready for fall, and I meant it, too - I ♥love♥love♥love♥ summer!  But, it didn't feel like summer today.  And Just Us Girls posted this inspiration photo:
So, I made more of those adorable little teacups Linda Parker designed:
stamp set - Perpetual Birthday Calendar; ink - Tip Top Taupe, Delightful Dijon, Tangelo Twist, Crushed Curry, Cajun Craze; card stock - Very Vanilla, Always Artichoke; Big Shot with Circles Collection framelits and Seasonal Frame thinlits
I went back later and swapped out the chocolates for tea packets - that seemed more appropriate.

Then, going further in my calendar exploration of not summer, I took out a couple more new things from my Holiday Catalog pre-order and tried my hand at the Merry Monday challenge, where I have been sadly remiss in posting:
stamp set - Snow Place; ink - Real Red, Pear Pizzazz (I think my sponge dauber was contaminated, though), Always Artichoke, Memento Tuxedo Black, Soft Suede; Stampin' Write marker - Real Red; card stock - Always Artichoke, Pear Pizzazz, Whisper White; Big Shot with Snow Friends framelits and Boughs & Berries embossing folder; sponge daubers 

Haha - not my best work, but he was fun to put together and he just makes me smile. :-)  I really like all the pieces in the stamp set with all the matching little framelits - it's grown-up paper doll play for me!

Another site where I haven't posted lately as much as I'd like is Pile It On - they just happen to be looking for Animals Dressed Up this week.  And fortunately, it's fun/humorous week at the Glory of Christmas Challenge, where Helen chose my card last week as one the Top Three! - Thank you so much!

Thursday, August 20, 2015

adventure with 3D

I have once again waited until the last minute to remember to make a project for the Watercooler Challenge.  This fortnight, Susan challenged us to make anything 3D.  That's not really very challenging, with Pinterest to help.  I enjoy 3D projects, but I rely on the creativity and generosity of talented stampers who invent new projects and then share their methods.  (On the other hand, not procrastinating is evidently quite the challenge for me!)  I recently found an awesome tutorial I was looking forward to trying.  I just needed colors or a theme, and I found both at Stamp Ink Paper:


stamp set - An Open Heart; ink - Old Olive; Stampin' Write marker - Cherry Cobbler; card stock - Very Vanilla; tools - Envelope Punch Board; Big Shot with Circles collection framelits

This is a sturdy little cup, they go together quickly, and you can get two from one sheet of card stock.  Linda embossed hers, I wish I had tried that but I was hurrying - maybe next time!

Sunday, May 31, 2015

Star Struck Stampers masculine adventures

Our assignment for Star Struck Stampers team meeting today was Father's Day or masculine.  I thought I would take the leftover kits from Card Buffet for this card.  It was going to need a few minor changes to bring all the supplies to current, so I set about to do that this morning and discovered there were *no* leftover kits!  Card Buffets this month were busy, and so much fun - I love all the chatter and the new ideas I get from the creative participants!  

Since I needed to start from scratch, I used the sketch from CAS(E) this Sketch to make it easier:

stamp sets - Crazy about You, Gorgeous Grunge; ink - Lost Lagoon, Hello Honey; card stock - Hello Honey, Lost Lagoon; bakers twine - Crushed Curry

I also needed a 3D (anything but a card or scrapbook page) swap.  I thought about a mini bag or box, but didn't have any treats to fill them with (with which to fill them). I considered a gift card holder (my husband and my grandson's fathers will all receive gift cards), but that seemed too card-like.  I settled for an old stand-by and re-covered little note pads, because I had them on hand:
stamp sets - And Many More, The Open Sea; ink - Crumb Cake, Soft Suede, Night of Navy, Always Artichoke; card stock - Very Vanilla, Soft Suede; Stampin' Sponge

I've been totally captivated by collage-style stamping recently, and these were a lot of fun.  I may be a little too proud of myself for deciding on colors and stamp placement all by myself - no CASE-ing or challenge prompts involved!

And as a final visual treat, this is one of the cards we made, from a teammate's design.  It was a Father's Day card, but I need more birthday cards, so I switched the sentiment, making it perfect for the Seize the Birthday challenge Anything Goes:
stamp set - And Many More; ink - Pacific Point; card stock - Whisper White, Real Red, Pacific Point, Daffodil Delight, Pumpkin Pie, Basic Black; punch - Modern Label; Big Shot with Arrows embossing folder

Thursday, October 17, 2013

Fall-i-day Llama Hop Adventure


Fall-i-day = Fall + Holiday  (Remember?  From last year?  I still think it's just durn clever.)  

I forgot to hop last month with my llama friends, but I'm back this month, even though I almost forgot again and had to hurry!  Hopefully you've come from Stamping with Buffy - I just love her snowflake garland!  If you haven't been there yet, no worries, the Previous or Next button links at each blog on the hop will eventually take you all the way around and back to where you started.

I made these little Halloween tea treats for my fellow local demonstrators, and because the Stampin' Royalty challenge is Halloween goodie packaging.  I used orange and black because that's the monthly challenge at Catherine & Cathy Create, and because those are great Halloween colors:
stamp sets - Gorgeous Grunge, Off the Grid, Tags 4 You; ink - Pumpkin Pie, Basic Gray; card stock - Basic Black, Pumpkin Pie, Very Vanilla; punches - label bracket, 1-3/4" circle, 2-3/8" scallop circle; washi tape - Witches' Brew; sticky strip
I didn't have to hurry to make them, but they're very quick to make.  If your friends aren't tea drinkers, they'll hold Ghirardelli chocolate squares, too - yumm!

I did hurry to make this Thanksgiving card, but it was an idea I'd been working on since I received that big box o' stampin' stuff I mentioned last week - the new Truly Grateful stamp set was in it.  I love how it coordinates with the Sweater Weather paper - I thought the soft sky pattern was feathers until I paired it with this set, now I'm pretty sure it's a stylized wheat head (and I'm happy that I adhered it facing up).  Since I live in a log home, I pretty much "had to" have the two wood stamps in the set, and I also love being able to make more masculine cards - the current challenge at SU-Only Challenges - I think I will send this to my brother, who is a farmer and who also lives in a log home.  I used the newest sketch from Freshly Made Sketches:
stamp set - Truly Grateful; ink - Chocolate Chip, Crushed Curry, Sahara Sand; Stampin' Write marker - Soft Sky; card stock - Crushed Curry, Sahara Sand, Very Vanilla; designer series paper - Sweater Weather; 7/16" Natural Trim ribbon, Stampin' Dimensionals
That's all I have for you this month, but be sure to check out the talented Stephanie's creations at the next stop, Please Pass the Snail!


Thursday, September 12, 2013

Wacky Watercooler Holiday Hop adventure


I hope you're enjoying this Holiday edition of the Wacky Watercooler Blog Hop.  If you arrived here from Stamp with Bev, welcome!  If you're starting here, all the hop participants link in a circle and you'll arrive at Bev's again if you keep clicking Next buttons throughout the hop.  You can also find a "clickable" list of all the blogs at the Home site.

We're loving the new stamps, paper, and tools in the Holiday catalog and want to share our excitement with you.  If you've been here before, you know I make and send a LOT of Christmas cards.  Since I don't really send cards for the other holidays like Halloween and Thanksgiving, I don't usually buy many holiday-specific products.  I like the set Tags 4 You because there's a stamp for each of the popular winter holidays, a nice generic "to: - from:" stamp, AND there's a matching punch, so it has a lot of versatility.  I used it for both of my projects.  For Halloween, I also used the washi tape, which Stampin' Up!® gave conventioneers this year:

stamp set - Tags 4 You; ink - Pumpkin Pie; card stock - Basic Black, Pumpkin Pie, Very Vanilla; washi tape - Witches' Brew; punches - 1/34" circle, Label Bracket: Big Shot with Chevron embossing folder; Stampin' Dimensionals  


I probably would have bought the washi tape if I hadn't brought it home from convention - the three coordinating rolls come in one low priced package, it's incredibly easy to use and makes a fun embellishment.

For Thanksgiving, I splurged on the fall designer series paper Sweater Weather because I like the colors and patterns, and they're not holiday specific.  I think Mindy likes, them, too - they're the colors she chose for Fab Friday 26.  I used the Just Us Girls sketch and the Sunburst piecing technique that's been popular recently:

stamp set - Tags 4 You; ink - Pumpkin Pie; card stock - Sahara Sand; designer series paper - Sweater Weather; punch - Label Bracket; 7/16" Natural trim; Stampin' Dimensionals

Because I do make and send a lot of Christmas cards, I bought the Festive Flurry stamp set and framelit bundle as soon as I could - you may have seen some of the cards I've made using it.  I also wanted to try making an ornament based on the package tag you can see on pages 12 and 13 in the Holiday catalog:

stamp set - Festive Flurry; ink - Metallic Encore Silver; card stock - Brushed Silver, Silver Glimmer, Whisper White;  Big Shot with Festive Flurry framelits; Antique brad
 
Unfortunately I forgot to order that fabulous 1/8" Silver ribbon on page 28, so it's not ready to hang yet, but I still have a little time.

Thanks for stopping by - it's always nice to have visitors.  Please hop on to Gail's Stamping and Other Stuff:


Or, if you're hopping in a different order, you can choose to go back or home:


Wednesday, May 29, 2013

altered Altoids® adventure - a tutorial

Since Terri asked so nicely about the altered Altoids® tin I did for the blog hop, I've attempted a picture tutorial.

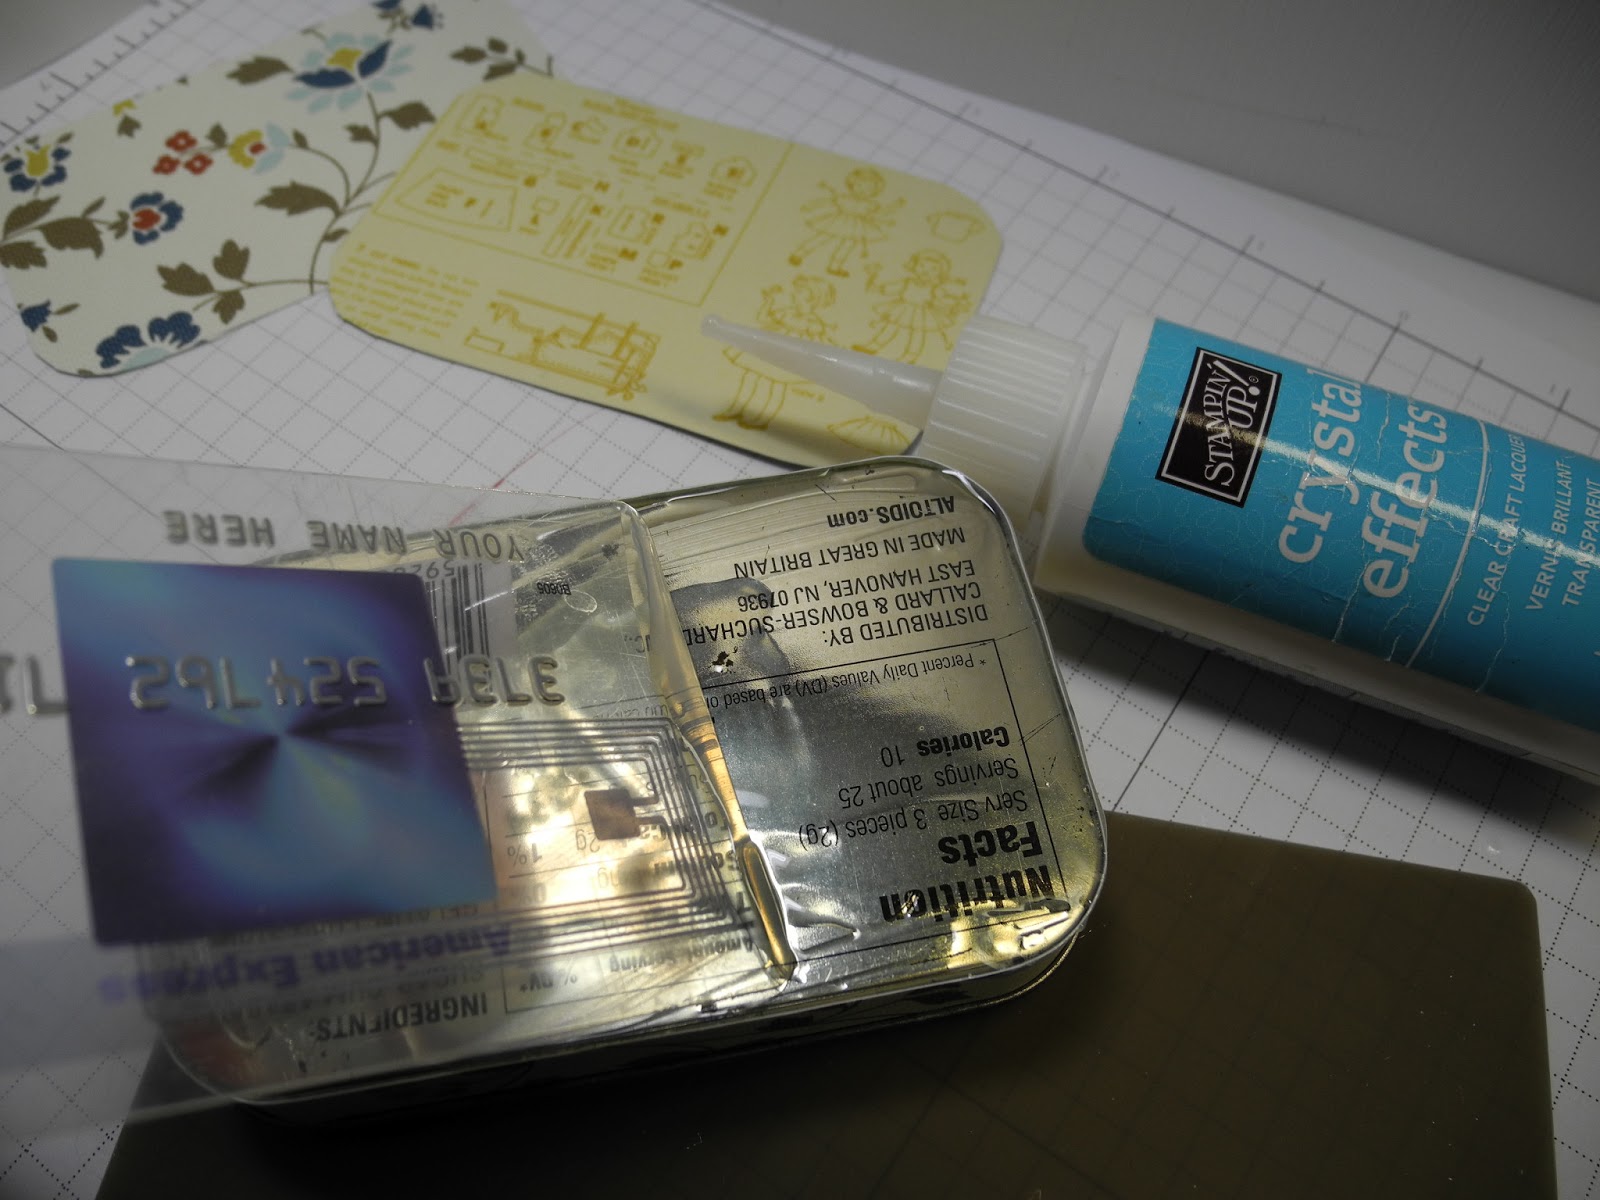
All you need are an Altoids® tin, designer series paper, some embellishments and Crystal Effects.  A good pair of paper snips is a must; a pencil and one of those fake credit cards from your junk mail will also be quite useful.

Start by cleaning the tin, washing out the candy dust and drying it well.  Trace the tin onto the designer series paper for the top (Print Poetry shown below) and the bottom and cut out the two pieces, cutting inside the traced lines.  Test fit them and trim if necessary. 

Cut two strips of designer series paper (I used retired Comfort Cafe for this tin) 12" long and 1/2" wide for the sides.  The strip that covers the bottom half of the sides should only extend to the lid when it's closed, not under it.  For both of the tins I've altered, the width of the bottom sides was exactly 1/2".  Starting at the center back of the tin, spread a thin layer of Crystal Effects on the tin (that fake credit card makes an excellent spreading tool!) and smooth the strip of designer series paper onto the tin. 


Continue around the corner and the end, spreading Crystal Effects and smoothing the paper down, and keep going around the tin, spreading CE and smoothing the paper down.  Before you glue down the last part at the back, trim off the excess paper to leave just a small overlap.

Use the fake credit card to spread a thin layer of Crystal Effects on the bottom:

Press and smooth the paper down all over, especially at the edges.  I wasn't too worried about perfection for the bottom and you can see a very slight gap in the upper right corner where the base piece doesn't quite meet the edge piece.

The second 12"x1/2" wide strip will cover the sides of the lid, above the little rolled metal lip, and will extend above the top of the lid.  Hold the strip against the center back and use your fingernail to mark where the hinge falls.  Trim out that little section before beginning to glue the strip.  Use the same method as the bottom sides - spread a thin layer of Crystal Effects, press the paper down, and continue around to the starting point.  Before spreading Crystal Effects on the last half of the back, mark and trim out the rectangle for the hinge, and trim the excess length off the strip so there's only a slight overlap (I haven't trimmed the length in this photo, but it shows the hinge cut-out):
The width of the strip that extends above the top of the lid will ensure that there are no little gaps of metal peeking out on the top.  Snip the overhanging paper, from the edge of the paper right up to the tin, at each curved corner.  Snip straight down the center of the curve and right where the curves start:

Using a little bit of Crystal Effects, glue down each tab.  This photo shows the tabs bent down, before gluing: 
You'll have to hold them down for a minute before moving on the next corner.  After all the corners are glued, then glue down the straight edges, again using a thin strip of Crystal Effects and pressing down the paper.  (You may want to take a little break to rub or wash the Crystal Effects off your fingertips at this point.)  Use your handy spreading tool to get a thin coat on the entire top of the tin, including the paper border, and smooth on the designer series paper.  Pay particular attention to the edges again:
Now it all needs to dry!  I leave it for at least 12 hours. 

If you want ribbon on the edge, I recommend Sticky Strip.  Apply it to the ribbon first, burnishing it on, then apply the ribbon to the tin, again burnishing it on.  I started in the center front, and added a bow over the seam.  I used Crystal Effects to attach the bow - it took more than I expected and took a long time to dry, but it seems to be very secure now.  I held it in place while it dried with a wooden spring-action clothes pin (a binder clip would work, too).

Cover the bottom of tin with a thick layer of Crystal Effects.  Draw it along one edge, using the tip of the bottle to push the CE right to the edges. 

 Move back and forth across the tin, adding and spreading CE as you work.  Take your time, and try to make an even layer all over, using the bottle tip to push the CE around as needed.  If you notice a thin spot, add a little CE and spread it into the surrounding area.

Now it needs to dry again, this time for at least 24 hours.  Depending on your humidity, it may take longer!  You can see in the photo above that it's a little cloudy; you'll know it's dry when it's clear.

Cover the paper on the sides of the tin with a layer of Crystal Effects and let it dry.  The edges don't get as much wear, so I only put on a thin layer.  Don't spread CE on the hinges, just around them.

Arrange your embellishments on the top and stick them in place with Crystal Effects.  If you have a stamped element, the top layer of Crystal Effects will cause the stamping to blur.  I used Versamark and clear Stampin' Emboss powder on my name banner to keep it from blurring, but for some stamped images a little blurring might be artistic. 

When the CE holding the embellishments is dry, start your thick top layer by going around the raised embellishments first.  The Cajun Craze card stock sizzlit button needed a little supporting CE under the edge, and I also covered the tops of all the buttons.  Working out from the embellishments, filling in between them first, add and spread CE using the bottle tip.  Work out towards the edges, and push the CE right up to the edges of the tin.
On the first tin I altered, I put three thin layers of CE on the top, allowing it to dry completely between layers.  That tin had a card stock butterfly embellishment on two layers of thin cardboard, and the three layers of CE together were level with the card stock.  I intended to add a fourth layer on top of the stamped card stock, but then I remembered that the CE would cause the stamping to blur, so I didn't add that last layer.  For this tin, I only used one thick layer.  It isn't level with the embellishments, but since they're covered and there is CE around the edges of the embellishments as well, they're not going anywhere.

In the photo below, you can see that it becomes clear when it's completely dry:
Now it's time to fill it!
I hope you found this helpful, feel free to leave a message or send an email if you have any questions.